Sunday 16 December 2018

Chapter 6: Cutwork

We have done cutwork earlier in the course and I really enjoyed the effects that that produced but now we are to incorporate that technique with machine embroidery in order to mimic some of the designs from Chapter 2. So far I have made just four samples but may do more ...

Fig. 6:1
 Sample 1 uses a snow-dyed cotton fabric backed with felt, as the piece of cotton fabric was far too small to fit into a hoop. This first layer was stitched with simple rows of straight stitching. The top layer is a hand-dyed scrim stitched in a circular design. I had intended to do further samples from the other designs in this series but I really couldn't work out how to add the third layer as the designs seemed too complex. With more experience, I may return to this at a future date.

Fig. 6:2
 Sample 2 uses a painted bondaweb fabric attached again to a felt backing. This was stitched with wavy lines in dark blue and light blue thread. A double layer of white organza was stitched with circles in a pale blue thread and cut away to reveal the layer beneath.

Fig. 6:3
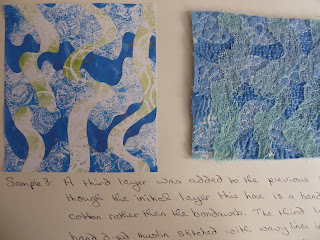
Sample 3 shows that this time I did manage to add a third layer to the previous example. This time the initial layer is a hand-dyed cotton fabric rather than the bondaweb. The third layer is hand dyed scrim stitched with wavy lines in white thread. The stitching on this third layer doesn't really show up very well and with hindsight a cable stitched line with thicker thread in the spool would have improved the effect.

Fig. 6:4
Sample 4 shows a further development of this same design. The first layer is again stitched on a painted bondaweb fabric. The second layer - the organza - was burned away with a soldering iron. The third layer was cable stitched this time, with a fine coton-a-broder in the spool. The final layer is a dark blue jersey fabric which has been whip stitched with a zig-zag. Although I'm pleased with the way this mimics the marks on the original dark blue paper, I had hoped that this fabric might have frayed rather more than it did.

Again, I'm pleased with the effects I've achieved using this technique and feel that they mimic the original paper designs quite accurately.

Chapter 5: Interpreting drawings

For this chapter we were asked to interpret some of our papers from earlier in the module in free machine stitch.

Fig. 5:1
White thread using a zig-zag stitch on a painted bondaweb fabric

Fig. 5:2
Sample 2 shows a whip-stitch spiralling vermicelli pattern in anvy thread with a bright yellow viscose thread on the spool on a snow-dyed cotton fabric.

Fig. 5:3
Sample 3 is whip stitch crosses in a dark turquoise thread with the yellow viscose thread still on the spool. It was worked on a snow-dyed cotton fabricand some of the joining threads were left in place.

Fig. 5:4
Sample 4 is a whipped zig-zag stitch in a random pattern using white thread on a cotton fabric background which has painted bondaweb attached to it.

Fig. 5:5a

Fig. 5:5b
 Sample 5 shoes whip stitch circles in a navy sewing cotton and a yellow viscose thread stitched on top with white sewing cotton on the spool. 
I've employed a little poetic licence with samples 5, 6 and 8 as the paper in the original drawings was white but I have used the snow-dyed fabric as a background to give more colour and visual texture.

Fig. 5:6
Sample 6 is 'satin stitch' spots worked with a zig-zag stitch in navy cotton thread.

Fig. 5:7
 Sample 7 shows straight stitch worked in pale turquoise thread with patches of cable stitch using one of my hand-dyed perle threads.

Fig. 5:8
Sample 8 shows spirals worked in a dark turquoise machine embroidery thread and a bright yellow viscose.

Fig. 5:9
Sample 9 is circles stitched on hand-dyed scrim. Some threads of the fabric were cut to produce holes, while others were just pulled apart. I love this lacy effect!

Fig. 5:10 
Sample 10 shows cable stitch lines in a white perle cotton. The loops of the top thread that happened along the way actually serve to mimic the blurred sections of the original monoprint.

Fig. 5:11
This final sample shows circles stitched in a deep turquoise and a yellow thread. I was hoping to achieve the same visual mix which appears green in the original, and in some places, where the threads are very close together, I think this almost works. The reverse of this piece (see Fig. 5:12 below) has produced a lovely whip stitch as I forgot to change my tension before starting to stitch, which does mimic the blurred lines made with the oil pastels on the original rubbing.

Fig. 5:12


Overall I'm really pleased with how effectively the machine stitch echoes the original marks made on paper, and, against all my expectations, I've really enjoyed this chapter and am definitely beginning to feel more in control of my sewing machine!!

Chapter 4: Colour

Fig. 4:1
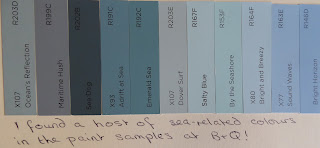
We were asked to find/colour fabrics and threads to match our twin themes of sea and sky, which related to the images we had chosen at the beginning of this module. Whilst looking around B & Q at paint colours for my brother's house, I came across a whole host of sea related colours in the paint samples. Of no practical use to the module of course, but an interesting and useful palette to have in mind.

I began by looking through my stash of fabrics for any which might be suitable and came up with this selection:

Fig. 4:2

Fig. 4:3

The fabrics in 4:2 are ones dyed by me for previous modules of this course, which are in the correct colour palette. Those in Fig. 4:3 are commercially printed fabrics, which may be of use at a later stage.

To colour my fabrics and threads this time I used just three colours of Procion dye - turquoise, ultramarine and lemon yellow.

Fig. 4:4

Fig. 4:5

Fig. 4:6

I used two types of thread - a bright white cotton perle and an undyed soft cotton thread, both of which I wound into 10 metre hanks (Fig. 4:4). I used a low immersion dye technique for both fabric and threads. The fabric (cotton, organdie and scrim) was scrunched up into the cocoa jars while the threads were draped between jamjars, each containing a different colour of dye (Fig. 4:5). The resulting threads are shown in Fig. 4:6.

Fig. 4:7

Fig. 4:8

The fabrics in Figs 4:7 and 4:8 were snow-dyed earlier in the year, using the same three colours, taking advantage of the 'Beast from the East' which provided us with lovely, powdery snow, which proved perfect for this very simple method of producing random dyed fabric.

Fig. 4:9 Organza

Fig. 4:10 Scrim

Fig. 4:11 Organza scarf

The fabric in 4:11 did not take up the dye very well and I realize with hindsight that this is probably due to its nylon content.

Fig. 4:12

Fig. 4:13

Fig. 4:14


Fig. 4:15

Fig. 4:16

I also painted some bondaweb and attached this to several pieces of white cotton fabric, which has produced some lovely sea-like effects (4:12 - 4:16).

Fig. 4:17

To complete the collection, Fig. 4:17 shows a selection of threads, some of those which I hand-dyed, others which are commercially produced.