
Fig.1
This was my planned design, loosely based on 'my' lizard's tail and eye, and worked in my chosen colour scheme of purple and gold.

Fig.2
It took several attempts to make a pattern which actually fitted and coiled around my neck as I wanted it to do. When I had one I was happy with I cut it out of a piece of my printed fabric which had metallic purple and gold spirals printed onto a black cotton fabric. Once all the stitching was completed I backed this with more mono-printed fabric, this time in purple (see the swatch on the composite board shown in Fig.9).

Fig.3
The completed collar

Fig.4
I used several of my hand made cords to simulate the lizard's tail together with beads. The thick wrapped cord has randomly spaced exposed threads and beads along its length.

Fig.5
The 'eye' side of the collar has three Yorkshire buttons attached, one of them embellished with a spiral of yellow beads. Metallic gold and purple threads were then couched down in a spiralling pattern and seed beads in yellow and purple attached in all the loops of the spirals.

Fig.6
I buttonholed all around the edge of the piece to neaten the edge and to attach the lining, though with hindsight I wish I had made more of this edge, perhaps by adding some of my cords to make a spiralling edge.

Fig.7
Fig.7 shows the back of the collar where the two sides meet.

Fig.8
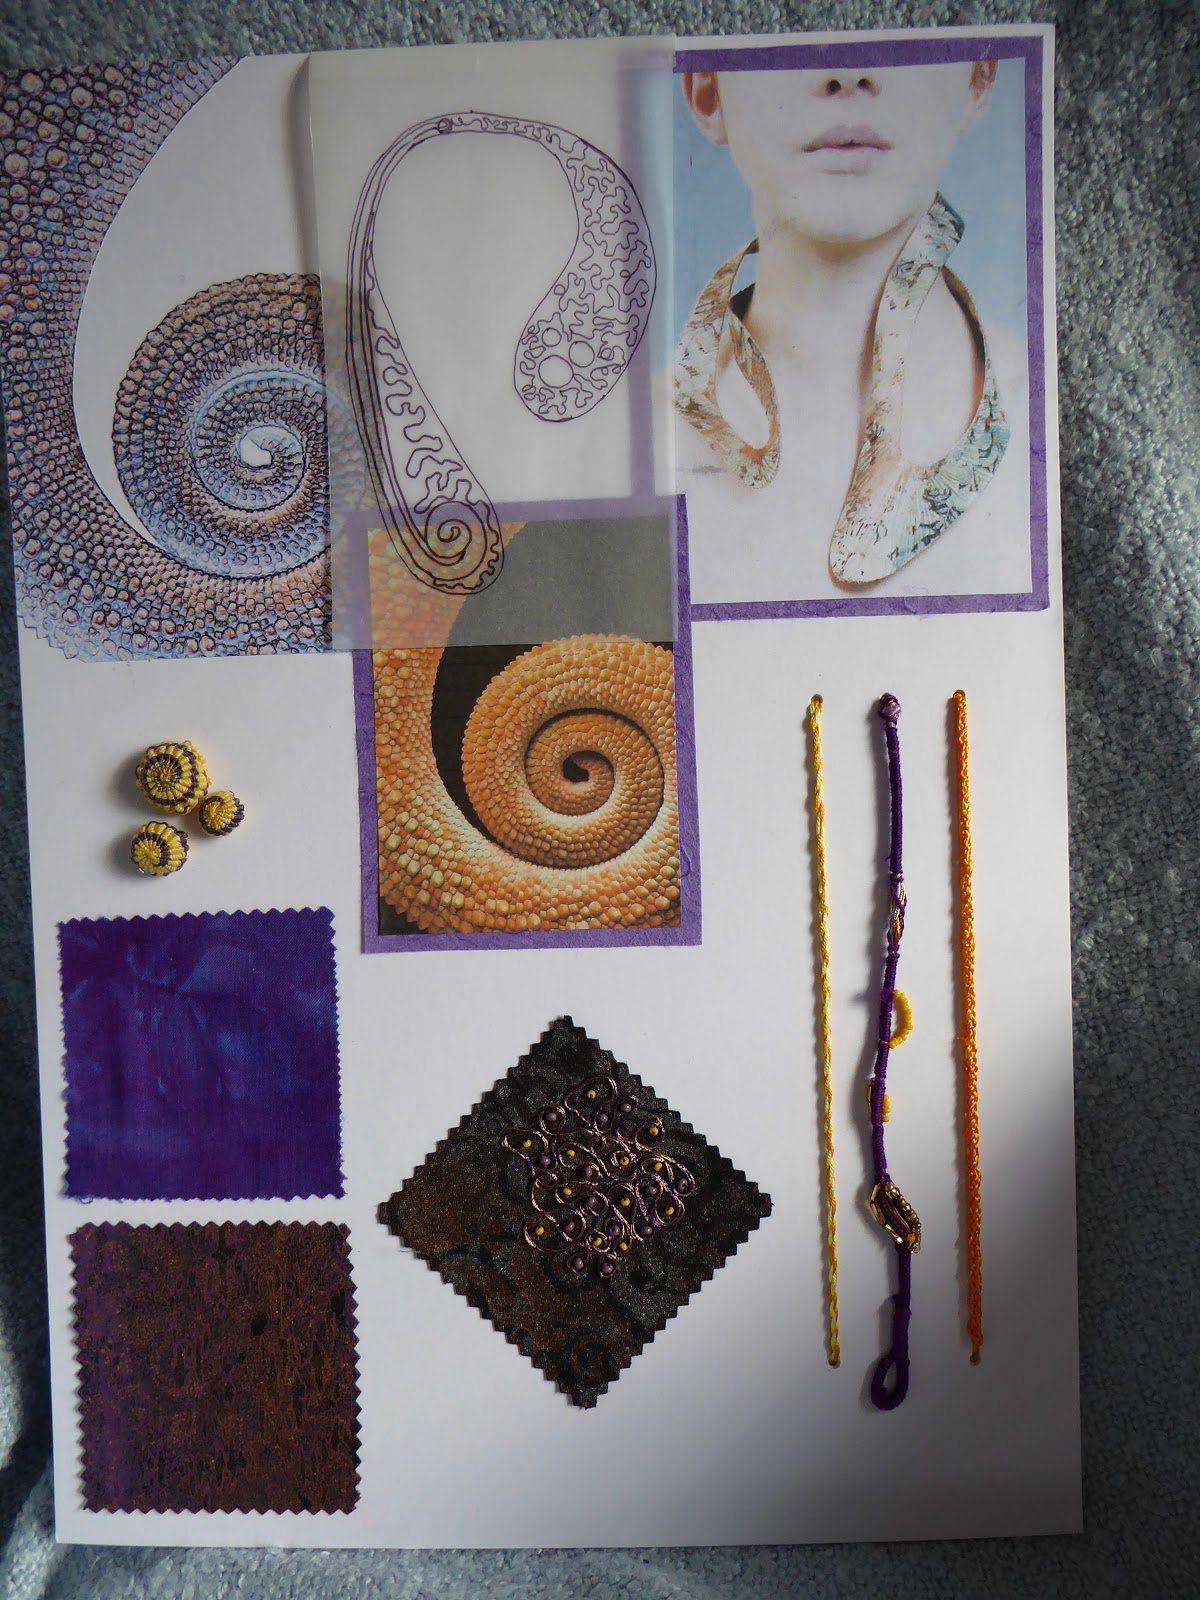
Fig.9
Composite sheet showing my inspiration sources - the metal neckpiece and my lizard's tail, complete with computer manipulated image which inspired the colour choices. I've overlaid a drawing of my design on translucent tracing paper. Examples of the cords and Yorkshire buttons used are included, together with samples of the top fabric, the lining fabric and a sample of the bead embroidery.
Zandra Rhodes

Fig.10

Fig.11
Deirdre Hawken

Fig.12
Gustav Klimt

Fig.13
Chapter 1 and 2: Research 20 hours
Chapter 3: Dyeing fabric 8 hours
Chapter 4: Stitching spirals 9 hours
Chapter 5: Making cords 7 hours
Chapter 6: Making tassels 5 hours
Chapter 7: Making buttons 10 hours
Chapter 8: Beadwork samples 15 hours
Chapter 9: Resolved sample 20 hours
Chapter 10 and 11: Designing/making accessory 31 hours
Chapter 12: Research three artists 6 hours
Total for Module 3: 131 hours
Module begun: April 2016; Accessory completed: January 2017 (this bears no reflection to the time actually taken)
Costs
Fabric: 3 metres IKEA curtain lining for dyeing £4.50
Bondaweb: 1 metre £3.50
Threads - taken from stock £10.00
Beads - taken from stock £8.00
Procion dyes - taken from stock £5.00
Curtain rings from hardware store (Dorset buttons) £1.99
Card/mount board £1.50
Lining paper £2.00
Workbook - Pink Pig A4 £4.79
Total £41.28
Book list
Creative Embroidery - Jan Beaney and Jean Littlejohn
Designing Worksheets for Textile Students - Jan Messent
Designing with Pattern - Jan Messent
The Embroiderers Workbook - Jan Messent
Machine Embroidery Stitched Patterns - Valerie Campbell-Harding
RSN Guide to Bead Embroidery - Shelley Cox
Decorative Tassels and Cords - Effie Mitrofanis
Dyeing in Plastic Bags - Helen Deighton
Health and Safety
Using Procion dyes:
- Wear a mask and rubber gloves when mixing dyes
- Protect work surfaces and clothing
- Dispose of left over dyes carefully (or use to colour paper for future projects)
Free motion machining:
- Always use correct foot on machine and keep hands on the hoop, well away from the needle
- Take care when guiding cords through the machine while making machine wrapped cords
- Store cords well away from pets
Using hot air gun to make toggles:
- Wear a mask to protect yourself from fumes
- Use in a well-ventilated room
- Have a heat-proof surface to lay tools on
- Take care not to touch hot surfaces
- Allow tools to cool fully before putting away
Beadwork:
- Keep beads away from pets and ensure you don't leave any that have dropped on the floor
General:
Do not allow electrical flexes to trail where they may be snagged or cause a tripping hazard
Storage of work, materials, tools and equipment
As I live alone I have several rooms in my house to work in - one bedroom houses my sewing machine and fabric; the study has my computer, embroidery threads and tools and a comfortable chair for hand stitching and my garage is designated as my workroom for painting, dyeing and other 'messy' activities.
Design work in progress - in sketchbook and marked folders away from sun, dust and liquids in the study
Completed embroidery - in acid free plastic pockets in a folder which houses all my City and Guilds completed pieces
Completed design work - in sketchbook and/or in folders as above
Papers for design work - in folders in the workroom
Inks and paints - upright with lids secured in drawers and plastic boxes in workroom
Glue, bleach etc - upright with lids secured in a cupboard away from pets and children
Embroidery in progress - in a box on the worktable in my study or sewing room (as appropriate)
Fabrics - in boxes according to colour and type in sewing room
Threads - in boxes according to colour and type; wrapped on cards in my study
Beads, metal threads - in boxes on the shelves in my study
Dyes - upright with lids secure in boxes in the workroom
Sewing machine - set up ready for use, covered with its dust cover, in my sewing room
Electrical equipment - in boxes with flexes lightly wound in the workroom
Evaluation
The assessment piece for Module 3 is an accessory based on the design topic of spirals.
I am fairly happy with my accessory in that it is fit for purpose and fulfils the design brief. I chose to make a neckpiece using my lizard as inspiration. (I say 'my' lizard but I don't actually own a lizard. This is the one that I also used as inspiration in Module 2). The resulting piece fits and remains in position when worn. The design I have used relates to the coiled tail and bulging eyes of the lizard and references the colours in one of my manipulated images of the lizard's tail.
If I were to make the piece again I might try to make the piece more fanciful and not keep within the boundaries of the fabric piece I had cut. Perhaps using the wrapped cords as I did when making my little pot in Chapter 7.
I am concerned that I am often too literal in my work and thinking of this brings to mind what Jan Beaney said at Summer School last year about looking for the 'essence' of what attracted you to a subject and exaggerating those aspects in your design, while ignoring others, rather than attempting an exact copy of the original. That is what I have tried to do here by using the manipulated image, but I think I could perhaps have gone further.
Authentification certificate


