Fig. 6:1
Sample 1 uses a snow-dyed cotton fabric backed with felt, as the piece of cotton fabric was far too small to fit into a hoop. This first layer was stitched with simple rows of straight stitching. The top layer is a hand-dyed scrim stitched in a circular design. I had intended to do further samples from the other designs in this series but I really couldn't work out how to add the third layer as the designs seemed too complex. With more experience, I may return to this at a future date.
Fig. 6:2
Sample 2 uses a painted bondaweb fabric attached again to a felt backing. This was stitched with wavy lines in dark blue and light blue thread. A double layer of white organza was stitched with circles in a pale blue thread and cut away to reveal the layer beneath.
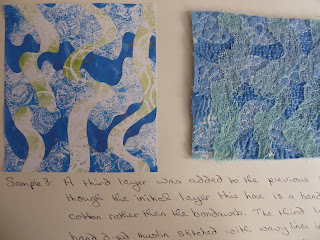
Fig. 6:3
Sample 3 shows that this time I did manage to add a third layer to the previous example. This time the initial layer is a hand-dyed cotton fabric rather than the bondaweb. The third layer is hand dyed scrim stitched with wavy lines in white thread. The stitching on this third layer doesn't really show up very well and with hindsight a cable stitched line with thicker thread in the spool would have improved the effect.
Fig. 6:4
Sample 4 shows a further development of this same design. The first layer is again stitched on a painted bondaweb fabric. The second layer - the organza - was burned away with a soldering iron. The third layer was cable stitched this time, with a fine coton-a-broder in the spool. The final layer is a dark blue jersey fabric which has been whip stitched with a zig-zag. Although I'm pleased with the way this mimics the marks on the original dark blue paper, I had hoped that this fabric might have frayed rather more than it did.Again, I'm pleased with the effects I've achieved using this technique and feel that they mimic the original paper designs quite accurately.


No comments:
Post a Comment