Fig. 6:1
Sample6:1 - basic straight tucks - machine stitched on calico 1/4" away from the fold.
Fig. 6:2
Fig. 6:2 shows from left to right - a series of very narrow pin tucks, three tucks stuffed with lengths of tapestry wool (not visible on the photograph but the wool strands do stick out at the edge of the fabric) and a group of high tucks with three rows of stitching. Probably due to the fact that I worked these on a lightweight calico the high tucks rather disappointingly don't actually stand up as I had hoped. A firmer fabric might help them to achieve this.
Fig. 6:3
Fig. 6:3 - Wide tucks stitched across in alternating directions to form textural folds. If this were done in a more random pattern this could produce even more interesting textures.
Fig. 6:4
Fig. 6:4 - Narrow tucks with more tucks stitched at right angles with the original tucks being folded in different directions. This has succeeded in making the vertical tucks stand upright and produces a very interesting three dimensional surface.
Fig. 6:5
Fig. 6:5 shows quite wide tucks stitched down using a contrasting variegated thread, this time producing a more haphazard texture as the wider tucks fold and crease.
Fig. 6:6
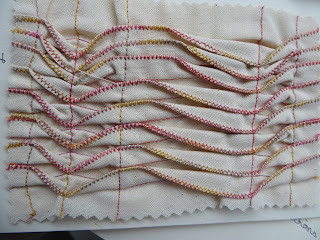
Fig. 6:6 - I stitched over the folds of the quite narrow tucks with a narrow zig-zag stitch before stitching across as before and this has produced a beautiful wave pattern.
Fig. 6:7
Fig. 6:7 - Another sample where I've combined the previous two samples
Fig. 6:8
Fig. 6:8 - A series of tucks stitched across at right angles with more tucks to produce a grid-like pattern.
Fig. 6:9
Simple, quite wide tucks with the narrow zig-zag worked over the folds
Fig. 6:10
And, again, the narrow zig-zag edges but this time hand stitched into a honeycomb pattern to look a little like smocking.
Fig. 6:11
Fig. 6:11 - Time to move on!! and this time a series of short tucks stitched randomly across the piece
Fig. 6:12
Fig. 6:12 - Tucks formed on the bias of the fabric with a single tuck made at right angles.I'm not entirely sure whether American smocking, counts as tucks or pleats but I couldn't resist trying out a few examples.
Fig. 6:13a
Fig. 6:13b
Fig. 6:13a and b - This design is called Arrows. The loops on the diagram show which points of the grid are joined together to form the pattern.
Fig. 6:14a
Fig. 6:14b
Fig. 6:14a and b - Simply called Grid, this produces an interesting design of parallel and overlapping bars.
Fig. 6:15a
Fig. 6:15b
And finally Fig. 6:15a and b is called Lattice.
Fig. 6:16
The next two samples show simple formal pleats, where the folded fabric is stitched only part way down the length - 6:16 is knife pleats
Fig. 6:17
and 6:17 box pleats. Either side can be used as the 'right' side.
Fig. 6:18
Gathering: Fig. 6:18 shows a sample where the fabric was machine gathered in a zig-zag pattern and the folds then manipulated slightly to align them and form this interesting v-shaped design.
Fig. 6:19
Fig. 6:19 is known as Furrowing, where the top fabric is cut twice the size of the backing fabric, gathered to fit around the edges and then the fullness caught down with tiny stab stitches in a random way across the piece. Great fun to do and a lovely resulting texture!
Fig. 6:20
I borrowed a pleating machine from my branch of the Embroiderer's Guild to make these next few samples. Here I threaded two needles, and omitted one across the width of the piece (fine muslin used in all these samples).
Fig. 6:21
For Sample 6:21 I loosened several of the rows of gathering threads to allow the piece to be manipulated. This piece isn't stitched onto a backing but doing so would allow the manipulated surface to be managed better and made more permanent.
Fig. 6:22
A narrow band of traditional English smocking was worked across one end of this sample, and the remainder allowed to relax a little.
Fig. 6:23
Bands of satin stitch were worked randomly across the surface in Sample 6:23. This is a lovely effect, especially with the use of a rayon thread which adds a sheen to the stitching, making them more obvious.
Fig. 6:24
More traditional English smocking for sample 6:24. I haven't done smocking since my daughter was very young so it was fun to revisit a technique not worked for over thirty years! I couldn't resist using stitches that would allow the finished piece to mimic a little party dress.
Fig. 6:25
And finally ... two Yo-yo's - circles of fabric gathered around the edges and pulled up, the smaller one fitting over the centre of the larger to give added height and texture.


No comments:
Post a Comment