Thursday, 9 June 2016

Module 3 - Spiralling into Colour - Chapter 1 Research

A new module and I'm delighted to be working in colour again. The first chapter, as always, involved researching spirals and of course, once you start looking, you find them everywhere! The difficulty is narrowing down your area of interest.

 Fig.1

I began by looking at the different types of spiral and, as I usually do in my own projects, looking at word definitions. I usually find that this helps me to focus my mind and in my other sketchbooks I often also find poems that relate to the topic I'm looking at. No poems here though ... yet. 

 Fig. 2

Next I looked for examples of the various spirals I'd found amongst my images of naturally occurring spirals and attempted to draw some of them. Favourites have to be the ammonites and shell interiors though the photograph of the twining plant tendril is also fascinating.

 Fig.3

 I have a bit of a 'thing' about chimneys (especially the beautifully decorated Tudor ones at Hampton Court and the like) and photograph them whenever I visit a National Trust property or when I'm just out and about. So I had lots of images of spiralling chimneys and Gaudi never fails me either, whether it's his fanciful chimneys, his use of colour, his beautiful mosaics or his naturalistic forms!

 Fig.4

Finally I looked at spirals in art from a variety of sources. I found this quote (not a poem) by Hundertwasser about spirals, which I found interesting. A recent visit to Harrogate Spring Flower show had given me lots of spirals too as there was a whole section in the floral art marquee on the subject. I found examples from across the world and through time and managed to draw a few examples of these. Never a confident artist, I have to say I was quite pleased with how the drawing of the pot came out - actually recognisable.

Fig. 5

I couldn't actually find any spirals in my house to do rubbings of but did find these two rubbing plates and then played with lots of spiralling patterns within a snail's shell in a kind of Zentangle style.

Thursday, 14 April 2016

Chapter 13 - Three artists, plus admin


Evaluation of Functional 3-dimensional embroidered item
My final item is a box with hinged lid inspired by ancient reliquaries seen in the Victoria and Albert Museum in London, the markings and features of a lizard and Gaudi’s dragon back roof on the Casa Batllo in Barcelona.

How do you feel about the resulting conclusion?
I am delighted with my box. I feel it answers the brief of producing a three-dimensional useful object inspired by animal print, utilising pieced, hand-dyed fabric and embroidery. I learned several new processes in this module, many of which I used to construct my box. I also overcame a number of small challenges, which made the whole process a very enjoyable and worthwhile learning exercise.

Is it fit for its purpose – give reasons
My box is indeed fit for purpose. It is of sturdy construction with a hinged lid which fastens securely with a button and ties. It is large enough to hold quite a substantial amount and it is attractive enough to keep on display in my home.

If you were asked to make it again, what changes would you make to the way you designed it and the way you made it?
If I were to make the box again I would make the lid a little larger than the body of the box to enable it to rest properly on the corner supports. I would probably do more surface machine embroidery on more of my fabrics before cutting and piecing them. I would also use more of the seam finishes which I sampled during the module and which then got largely forgotten in the concerns about getting the cutting and piecing done correctly.


Storage of work, materials, tools and equipment.

·         Papers and design work are stored flat in folders. I use a spiral bound sketchbook in which I keep samples and notes. These are kept in my study.
·         Inks, paints, dyes and glue for design work are stored upright in separate drawers in my garage workroom.
·         Bleach is stored securely in a cupboard inaccessible to my cat (no small children ever visit my home but it would be safe from them too).
·         Embroidery work in progress is kept in a purpose-made pouch. I have many of these, made over the years, in which I keep separate projects together with their relevant threads, beads etc.
·         Pins and needles – pins are stored in a small tin, needles are separated by type in a needlebook. Both are kept in a basket which travels with me from room to room so it is always accessible when needed.
·         Fabrics are stored, folded, in boxes according to type of fabric. The boxes are stored in a wardrobe in my sewing room.
·         Threads are stored in boxes according to type, use and colour. These boxes are stored on shelves in my study.
·         Sewing machine is kept covered when not in use, on a worktable in my sewing room.
·         Other electrical equipment is stored securely in a box in my garage workroom, each item with its flex tightly wound around it, and stored away only when cold.


Health and Safety considerations
·         Bleach – use in a well ventilated space; take care not to mix with other cleaning products as this can emit lethal fumes; store and use well away from pets (and small children).
·         Dyes – wear latex gloves to protect skin from damage or staining; wear protective (or old) clothing. Keep well away from food preparation areas and use tools and utensils not used in the kitchen. Store securely away from pets (and small children). Clean tools and containers thoroughly after use.
·         Craft knife and rotary cutter – always cut away from your body; use a safety ruler with finger guard; retract/cover the blade immediately after use; begin each new task with a sharp new blade; use light pressure and several cuts rather than risking a blade breaking during use by pressing too hard.
·         Sewing machine – follow the instruction manual carefully; do not allow cables to become trip hazards; cover when not in use.

Costing
A4 sketchbook                                   £4.99 
Glue stick                                           £1.99
Fabric for dyeing (IKEA)                  £4.00
Patchwork fabrics (printed)             £15.00 
Threads                                              £7.90
Dylon cold water dyes                       £6.00
Pelmet vilene                                     £2.50
Mountboard                                       £1.00
Wall lining paper                               £3.99
Total                                                £47.37

Timing
Date when embroidered item was started: 27.3.2016 - Date completed: 11.4.2016
A total of 26 weeks was spent on this module with an average of 7 hours per week. Considerably more time was spent during the last two weeks whilst constructing the box - approximately 30 hours in total with a further 12 spent on design work and sampling.

References
Strip Piecing by Valerie Campbell Harding
Shibori for Textile Artists by Janice Gunner
Blackwork Made Easy by Lesley Wilkins
Machine Embroidery - Stitch Techniques by Valerie Campbell Harding
Design Sources for Pattern by Jan Messent

3-dimensional embroidered item

My 3-dimensional item is a box, inspired by the markings and features of a lizard (photograph in my previous entry on this blog). I'm really pleased with the outcome and relieved to have finally managed to achieve the image that I had in my mind of how the box would look.

Fig.1 - Lining

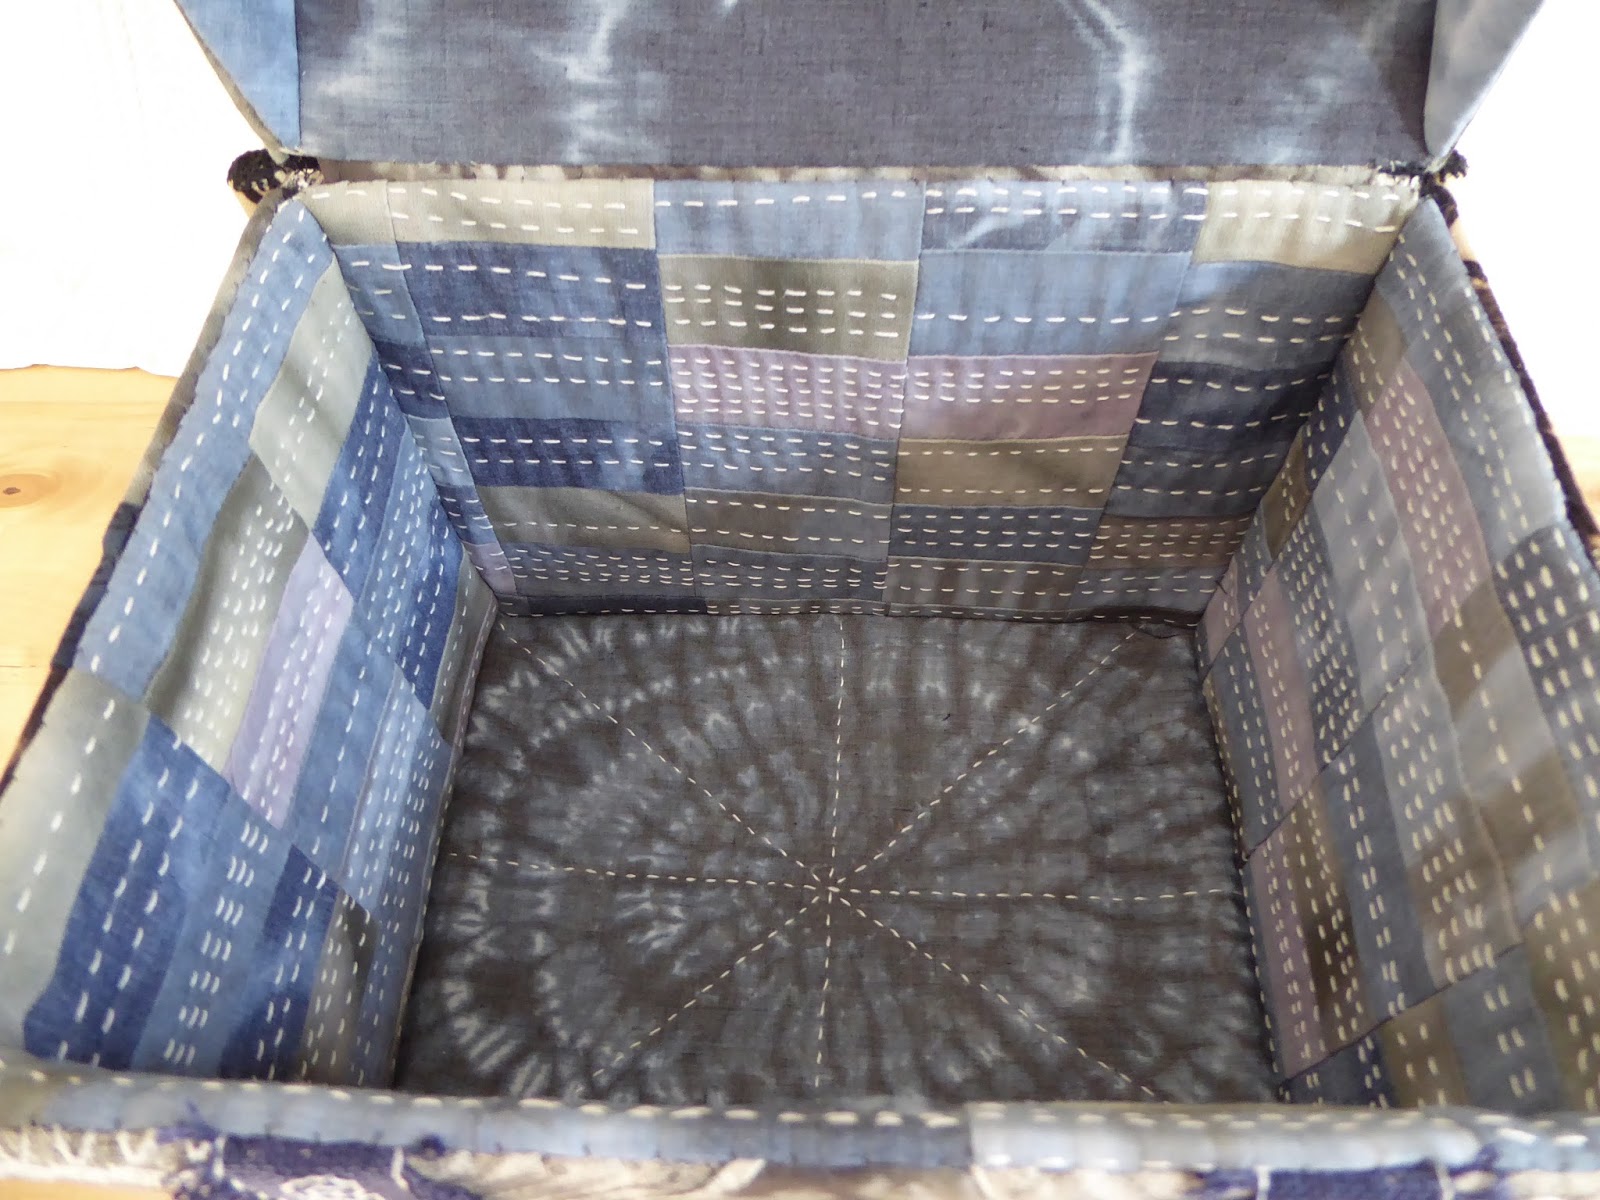
I decided to use all the beautiful paler blue and grey fabrics for the lining of my box and pieced these randomly in strips, which I then cut and pieced again and again until I had quite a large area of fabric from which I cut the lining pieces. I chose a particularly attractively marked piece for the base, which I left whole to showcase the pattern on the fabric. I feel much more at home with a needle in my hand than working at the sewing machine and so decided to back the lining with quilt batting and hand quilt with a random pattern of running stitches using a fine coton-a-broder thread in off-white.
Once quilted, the pieces were stitched onto pelmet vilene and stitched together, again by hand.


Fig.2 - Base
I chose a piece of mono-printed fabric with a lizard skin marking for the base of my box, which I laced over mount board.

 Fig.3 - Front and back
I pieced the front and back panels, attaching them together with separate strips of fabric to leave a gap, which would eventually be covered by strips of blackwork embroidery (Fig.4). The idea was that these would look like the straps sometimes seen on ancient reliquaries.

Fig.4 - 'Blackwork' embroidered strips
I didn't have any black evenweave fabric and couldn't source any locally so decided to use navy blue as a background for my white 'blackwork' embroidery.

 Fig.5 - Lid pieces
I used my machine embroidered strips of fabric for the triangular design on the lid of my box (Fig.5) to echo the spines on the back of my lizard, and the prairie points which would eventually add the final touch to the lid.

 Fig.6 - End panels
I used yet another different patchwork design for the end panels and Fig.7 below shows how all the pieces were laced over mountboard to give the box strength and the pieced panels a neat appearance.

Fig.7 - End panels showing lacing

Fig.8 - Lining for lid
Figure 8 shows how I made a cut down version of the lid for the lining in order to accommodate the base of the prairie point spines which would be trapped between the two lid pieces.

 Fig.9 - Completed box
Figure 9 shows the completed box in all its glory!, while Figure 10 below shows a better view of the prairie points on the lid, inspired by the dragon back roof on the Casa Batlla in Barcelona, designed by Gaudi.

 Fig.10

Fig.11
I added toggles to the top and bottom corners of the box for added decoration and a Dorset button inspired by my lizard's eye, together with some cords as a fastening.
 
 Fig.12

 Fig.13
Figures 13 and 14 show the lining of the box, together with the fabric hinge trapped between the box and lid.
 
Fig.14


Wednesday, 16 March 2016

Chapter 12: A false start in 3d

I began this chapter by making several three-dimensional shapes. I stuffed these and when the module is complete they will become toys for Willow my cat.

Fig.1

This image is a bit blurred - sorry, it was taken on my i-pad and enlarging the initial very small image has blurred it a little but I think it is still possible to make out the shapes. I made a cube, a pillow, a biscornu (covered in blackwork embroidery), a pyramid, a second pyramid made from four diamond shapes with the bottom point cut off, an open cylinder and a vessel made from nine octagons. The tall vessel at the back of this group was my first idea for a finished item.

Fig.2
 
I had originally thought of making a vase which would be tall enough to accommodate some lace flowers which I made some time ago, and to this end I began to pull images from magazines of possible shapes. Inspired by the lizards in my earlier research I eventually settled on the shape with curled back top edges seen in Figure 1 above. 
 
Fig.3

I worked with this idea for a few days and then ... I decided that actually the sides of the vase were not really wide enough to show off the patchwork patterns that I had worked so hard to develop. So ...

Fig.4

I decided to return to a note that I had jotted on my initial brainstorming page - the idea of making a 'little' container for holding secrets and dreams. More research on the internet, and through catalogues and booklets collected from various visits to the Victoria and Albert Museum in London over the years, ensued. I was drawn to the shape of a reliquary, with its ridged lid. This, I felt, fitted better with my idea of a box for holding precious secrets, and also gave a perfect vehicle for mimicking the spines on the back of my chosen lizard.

Fig.5

Fig.6

Fig.7

The spine of the lid will be reminiscent of Gaudi's dragon back roof in Barcelona with prairie points along the ridge.
Fig.8
Having made a paper model of the box I shall actually make the ends 6" square, rather than just 4" wide as they are in this image so it will look to have better proportions to its height of 6". The front and back measure 8" across.


Chapter 11 - fabric samples

I began this chapter playing with paper - the combinations of strips, colours and patterns are, I suspect, literally endless. I stopped after doing eleven samples.

Fig.1


Fig.2

I then stitched on some of my printed and bleached fabrics, though forgot to take photographs of some of these before I started cutting into them to make pieced samples.

Fig.3

 Fig.4

At Sian's suggestion I also overdyed some of my purchased fabrics with interesting results.
 
Fig.5

Fig.6

Fig.7

Fig.8

Fig.9 

The next task was to choose some of my designs to translate into fabric. I made three small samples ...
Fig.10

Fig.11

Fig.12

I also pieced a larger sample with embellished seams - lots of prairie points, bundles of threads, wrapped threads and bullion loops.

 Fig.13 

Finally in this chapter, we were asked to produce a larger sample similar to the one made for chapter 10 but this time from embroidered and patterned fabrics. As I had hated the earlier piece so much, this time I had to produce something neater and more attractive to my eye ...

Fig.14
... and just hope that it is acceptable.


Sunday, 13 March 2016

Chapter 10: Piecing

I did the paper exercises, cutting a strip of black and white papers in different ways to produce ever more intricate patterns

Fig.1

Fig.2

Fig.3

I then tried the challenge - to take a strip each of black and white fabric, cut, cut and cut again, piecing them together each time until my sewing machine could take no more. Actually, in the end, it was I who could take no more. 

Fig.4

This piece of stitching is, without doubt, the ugliest ever to come from my hands and I hated every moment of its production. I eventually gave up on it, and was very surprised by how frustrated and irritable it had made me feel.